Friday, April 6, 2012

Choosing a GPS Device for Strava: Mobile Phone or GPS?

I'm going to assume you know what Strava is - the website that times and maps your rides (or runs) and then compares them with others who have done the same ride or part of ride. You record the ride using a GPS device, and when finished, upload it to the Strava site and can then see how fast you were compared to others.
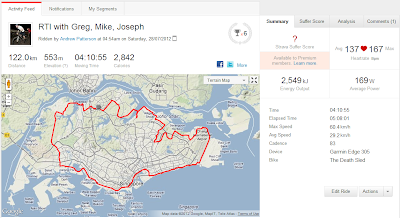
A screen capture of the Strava interface

I have been using Strva now for about nine months, starting with an iPhone. I always carry my phone with me on rides in case I get injured badly enough that I need to call for help or for other emergencies, so this is convenient.

With a mobile device (iOS or Android) you must download the Strava app, and then start it when you begin your ride. When you finish, click "end ride" and the data automatically upload to the Strava site. This is alwasy very easy for me, except about 2-3 times when the app has failed to record my rides. Strava has since rewritten the app and I don't think these bugs exist any more.

In November I bought a Garmin GPS from a neighbor who rides and who recently bought a newer Garmin. It came with the heart rate monitor and cadence sensor. I installed the cadence sensor on my road bike, and use the heart rate monitor on both road and off-road rides.

To use the Garmin is a bit more complex - first you have to ensure you have recieved a satellite signal, which I find can be difficult if you are moving or if the sky is very cloudy. (The iPhone gets a signal immediately via its 3G connection). Then, you have to press "Start/Stop" when you begin the ride and when you end.

The next step is to connect the Garmin to your computer with the USB cable (which also doubles as a charger). Now forget about the Garmin Connect site. Go to Strava.com, download some applet or driver from the site (which I had trouble doing in Chrome on a PC but no issues with in Chrome on a Mac), and the site will detect your Garmin.

Finally, you need to click on "Upload Activity" and subsequently select the events (rides) it finds in your Garmin using checkboxes, and hit "Upload". You can then name the ride, crop it, specify which bike you were on, and add comments or notes about it ("Saw pink pangolin" "Kristan made me sniff his gloves").

It will include any heart rate and cadence data that your mobile phone can't record.

So which is better? Originally I thought the Garmin would be superior for Strava, but eventually I realized the iPhone has its distinct advantages. Here are the pros and cons I see in each:

Mobile
Pros
  • No need to buy a new device if you already have an iPhone or Android
  • Upload happens instantly after the ride - no need to connect to your computer. Great when you ride fast in the morning and then rush off to work and don't have time to upload it manually.
  • Can record speed, distance, and location even underground, in carparks, under heavy clouds or other places a GPS-only device cannot. This is due to its 3G connection. This is a major bonus for me.
  • The app interface lets you see your speeds, history, records, and more - it even synchs with rides you did on your Garmin meaning it'll show your full Strava history
Cons
  • Doesn't show real-time data - meaning during a ride distance or speed at any given moment will be wrong. Major drawback
  • Doesn't record heart rate or cadence
  • The elevation it records is amusingly innacurate - sometimes speeds are too - but the mapping and distance are accurate
  • Drains your battery but has never killed mine - can easily handle 5-6 hours of recording so not an issue unless you'll be riding longer than that
GPS (Garmin)
Pros
  • Real-time monitoring - this is invaluable to me, especially when I'm racing
  • Has many other awesome features that could help you be a faster or more efficeint rider like averages (speed, cadence, heart rate), total distance traveled, sunrise and sunset, tons of data
  • Specific to Strava, the heart rate and cadence are important in calculating the Strava Sufferscore, an estimation of how much pain you endured which considers heart rate level, distance, time, and more.
  • Depending on the model you have you can see where you are on a map. Even some of the older Garmins that don't support maps can still help in navigation by at least showing your compass heading and a trail of where you have been.
  • Water, mud, and crashproff to some degree
Cons
  • They're kind of expensive once you buy the heart rate monitor and cadence sensor
  • If you leave it plugged into your computer to charge it, then shut off your computer, its battery may simply run down without you knowing it - a big bummer when your ride starts (that's when you use the iPhone as backup)
  • Spotty satellite reception at times, and slow to pick it up (up to 5 minutes)
If I had to choose one I'd still go for the Garmin, only for the invaluable race and training data I get from the heart rate monitor and cadence sensor.

Wednesday, March 21, 2012

Showers Pass VelEau 42 Hydration System

If you've consumed as many 40ozers as I have you'll know that 40oz is 1.18 litres (it says so on the labels). So a hydration system that holds 42 ounces will be around 1.2 litres of malt liquor, or eau as our Showers Pass friends must call water.

At 1.2 litres I think I could go 30-40km hard in our high humidity under the shade of the jungle. Anything longer and I may need a bit more. My smallest CamelBak holds 1.5 and I hardly ever finish it, even on the hottest of our tropical days.

So when my mom brought me a VelEau 42 straight from the source (Portland, Oregon - where, incidentally they have a lot of good beer as well!) I knew it was about the right size for me.

If the name "VelEau 42" seems cryptic to you, it can mean nothing other than 'bike water 42' in French, 42 obviously being the capacity. Now if I could only figure out what "Showers Pass" means.

Image from the Showers Pass site. Note the tool pouch.
I have three bikes and I don't want to use this for road riding. I'm perfectly happy with my two conventional water bottles, and on the road bike obviously wouldn't carry a CamelBak.

But here in Singapore, it's hot and humid 365 days a year, and a CamelBak worsens that. Any solution that can remove that sweaty hump from my back is welcome, and when I first saw this online I knew I wanted to try one.

So this would be best on one of the mountain bikes - how about the Giant Reign 1, a 6-inch all-mountain?

Installation was super simple and obvious - the strong plastic strap ratchets on through the saddle rails. It is secure as could be, and ought to fit on any bike. I saw some reviews online - no, not reviews - speculation - that it must wobble around, but I can clearly see that it won't.

The tube is secured to the stem/steerer with thin nylon strings on spring-loaded reels which hold it there with little magnets.

Without a pack I need a way to store my tools, tube(s), pump, phone and other junk I keep with me on every ride. The pouch only really has space for one fat MTB tube (way bigger than a little road tube), a larger multi-tool, and my wide Park Tools tire levers.

Phone, pliers, pump and other stuff will have to go somewhere else, or stay home. I do like to carry my phone for emergencies, especially when I ride across the border to our own little Tijuana (Johor Bahru, Malaysia). But I could do it roadie style and put it in my jersey pocket...which then means I have to wear a cycling jersey on my all-mountain MTB...

The pump could be attached to the frame using the bracket it came with, but that doesn't look so great. Or, I could stick to the road style mentioned above and chuck it in my jersey pocket.

Anyway, I have yet to try this, but will soon (race coming up this weekend in Malaysia) and I will post a follow-up with photos.

Time will tell if I stick with this or not.

---------

First impression 

Installed and ready for the trail


I like the hose in the middle of the bar by the stem where I can see it. Sometimes with my CamelBak I can't quite find the hose - it can flip around and get lost.

The flow of water was maybe a tiny bit weaker than any of my CamelBaks, but not so weak that I had to really suck. The valve is just like one of my CamelBak's valve - a simple piece of rubber without any lock like some have (which my High Sierra has but I never use).

The midde magnet


Upon releasing the hose from your mouth, the parachute cord reels it back to the magnet, hitting it about half the time. If I actually cut my hose down it would hit every time. Now the hose is too long but I'm just going to test it like this before trimming it.

The middle magnet on the top tube seemed to connect every time. The magnet and reel on the seat post always latched.

I routed the hose through the saddle as seen on the Showers Pass site - this is a neater and cleaner installation. It runs pretty close to the reservoir but the reservoir is so secure and stable there's no risk of pinching the tube.

I'm a pretty aggressive rider and tend to like to drop behind the saddle quite a lot. Surprisingly the VelEau didn't get in my way - I was able to slide behind it like I was riding down some steep terrain no problems. Let me give it a real ride and see for sure.

I didn't notice the weight (though I didn't fill it all the way with water). If anything I did notice the lack of weight on my back, so that will more than make up for any handling difference!

Some of the nice design features I observed:
  1. The surface of the bottom of it is a rubbery material that will be easily cleaned after picking up the inevitable mud and crud (as opposed to the nylon everywhere else)
  2. There are six small loops on the bottom of it and six on top which could be used to attach anything - pump, small pack, fender, bottle of beer
  3. Reflective tubing around the top of it, as well as a large reflective label that could double as a hook to attach a light
  4. The connection to the seat post is simple and elegant: a rubber block that will fit snugly to any post, secured by velcro. In fact it's strong enough to hold the whole thing on its own - I tested it.
Note the black block between the seat post and the hard plastic tube routing

Obviously a lot of thought and development was put into this product. Again, the real test will be real riding.


---------

The Verdict


A race is the ultimate test for not only the rider and the bike but the supporting equipment. My first trail test of thie VelEau 42 was in a race of about 450 riders in Pasir Gudang, Johor, Malaysia. The course consisted of 45 km of fire roads, plantation roads, singletrack and some paved roads.

The first test was whether or not the bite valve would return home to its position on the stem easily. As per my parking lot test, it did about half the time, but would have more if I had trimmed the hose shorter. By returning home I mean each of the magnets connecting directly and immediately without any intervention on my part. This is good enough for me because I can trim the hose and because adjusting it is not an issue, not even in a race.

The second test, maybe the one I was most worried about, was how securely it connects to the bike. And boy did I ever test this! At the bottom of a hill was a muddy depression which I hit squarely and hard. My front wheel sank 1/3 and immediately froze. This catapulted me spectacularly into the air, over the bar, the bike acting as a lever with the VelEau at the end of it.

Unbeknownst to me, my Garmin embedded itself into the mud (amid hundreds of other racers - this was at the start) but the Showers Pass wasn't phased. It didn't rotate left or right, the hose didn't go anywhere, and everything was secure. (Incidentally, I had to backtrack later when I realized I had lost my GPS. The force of the fall was so great that it completely annihilated the hard plastic bracket the Garmin uses to connect to my bar.)

Throughout the rest of the race, I had no issues. I felt liberated by not having to carry a pack or bottles in my jersey pocket.

The thing got entirely encrusted in mud but washed clean easily.

Overall, I'm very happy with it and I will keep using it.

Singlespeed and Knee Pain

After a few months of hard singlespeed riding, during a 120km road ride, I experienced a sharp pain in my right knee. It felt like a red hot needle was being poked through it, right along the joint. The pain was all the way through, laterally, equal on both the inside and outside.

The pain came when I pedalled hard or mashed with that leg. At a fast and light spin it was back to normal - standing up or going in a bigger gear intensified the pain.

After a number of visits to a physiotherapist and a doctor, I determined the pain is a result of:


  1. An injury I had to this knee 11 years before
  2. Overuse from mashing too hard, mostly on my singlespeed (at a high ratio too!)
  3. Low cadence (point 2) even on a road bike (cadence around 75)
  4. The daily wear and tear of even road riding


The physiotherapist gave me exercised to do but couldn't really help. He had me take videos of myself on my bike to check my position, and he said it was ok.

I had a more experienced friend re-fit me on my road bike and check my cleat position also - all ok (after I bought a shorter stem).

The doctor prescribed me some medicine that is designed to help regenerate the knee (and shoulder). They are Regenerix and Arthrex DX.

Since taking those I've had no problems, only some slight dull pain that I can live with. But I have had no problems during rides.

The moral of the story: If you ride singlespeed err on an easier gear. Don't overdo it like I did. Don't try for a harder gear thinking you'll get stronger, especially if you have ever had a knee injury before.


Friday, December 16, 2011

So I got the Homebrewed cogs in the mail awhile back - and they are every bit as beautiful as people say they are.

15, 16, 33

Nice and thick to prevent damaging your  cassette body

On the bike

Sunday, October 9, 2011

Homebrewed Components - Choosing a Chainring and Cog Combo

For my post on choosing a rear cog go here: choosing a cog

I'm in the market for a new cog and chainring for my singlespeed. Homebrewed Components seems to be a preferred designer and manufacturer of cogs and rings by many singlespeeders, and is mentioned quite a bit in the mtbr.com forums.

Dan Wilcox is the man behind Homebrewed. He explains how the business started:

After being a Machinist/Engineer for my whole working life, i decided to start up my own machine shop. Granted, doing it in the height of the economic recession was probably not the best of ideas, but i figured what does not kill me will only make me stronger. Also, i figured it would keep me from making a bunch of useless crap that has flooded the markets partially causing this predicament we’re in.
At first, i started making parts for other companies and building tooling for people i had worked for in the past. That was going OK, but it wasn't really what i wanted to do with my capabilities. Also, i take pride in what i do, and if I’m going to make something, i want my name on it, not someone else’s. 
Now here’s where i started thinking… what do i like to do the most? Well, that would be creating things and mountain biking. How can i put those 2 together? Well duh, make bike parts! At first it was just going to be a hobby to cure some boredom in between the normal work. I started making chain tensioners using part of a design that i had made a few years ago. The only modifications i did to it were basically a little material removal to lighten them up. I posted them up on a web forum and got some decent feedback along with a few orders.

Read the full post at the Homebrewed Components blog.

I'm currently running a 2:1 ratio, and feel I could do better with a fraction more, maybe 2.1:1 or 2.2:1. This will make my flats a bit faster and the hills harder. Coming from a 32 - 18, I was on a 1.78:1 ratio. So a jump up to 2:1 was 22 tenths.

Using this 22 tenths figure as a benchmark, I don't think I could handle another jump of 22 tenths considering the terrain where I live (it's not very hilly but the few hills we have would be very hard for me at 2.22:1 I think.

Let's take a look at the combinations Dan from Homebrewed offers. This is a grid between the aluminum chainrings he has which are compatible with 104 BCD (for Shimano) and his aluminum standard cogs.
Ratios between Homebrewed Al chainrings and Al cogs

The red cells are ratios I don't think I can handle. The greens are even less viable as they're even easier than what I'm running now. And the orange cells are what I'm on now.

So my best options are those in the white, above 2.0 and below 2.22. I think 2.21, 2.20, and 2.19 are probably just about the same or indistinguishable from 2.22, so I'll avoid those. I think 2.12 or 2.13 would be best.

Starting from the bottom of the chart, 2.12 at 36-17 is good, as it affords more chainwrap than the other options, but it doesn't leave me with many options if 2.12 is too hard or too easy - the neighboring cells are 2.0 and 2.25.

The next choice is 35-17 producing a ratio of 2.06, which probably isn't quite aggressive enough. 35-16 sounds just right, and if it is too hard, I can keep the 35 and easily move to a 17 cog.

The problem with 34-16, is I can only move down to a 2.0 if the 2.13 is too hard.

A 33 chainring give me almost exactly the same ratios as a 35, but being smaller would be a hair lighter - but I'd lose some chainwrap.

32-15 is the same as 34-16, including the neighboring options.

A 31 ring looks good, as I can get 2.21 with a 14 or if that's too hard, 2.07 with a 15.

I wonder just how critical chainwrap is. I suppose there's only one way to find out, and that's test it myself by buying a 31-14 and 15.

Last, I wonder why Homebrewed has so many other ratios that very few singlespeeders would ever want. I'd imagine the 31-24 combo would be far too slow to ride on the road and not practical unless you lived in a super hilly area.

-----

Update, 11 Oct, 11

As I was about to place my order, I noticed a note regarding the 31T chainring. It says:

This is enough for me to not order the 31, not knowing the extent to the modifications or why it may not fit.

Thus, I'll go with a 33 and a 15 and 16 for almost identical ratios to the 31 with a 14 and 15.

Saturday, August 27, 2011

Jeff Jones Titec J-Bar

I have always admired Jeff Jones bikes and the unorthodox geometry he designs into them. Plus he's a fellow Oregonian, so that makes me all the more interested in his products.

So when I saw a very lightly-used Titec J-Bar for sale, designed by the man himself, I grabbed it.

Designed by Jones, built by Titec
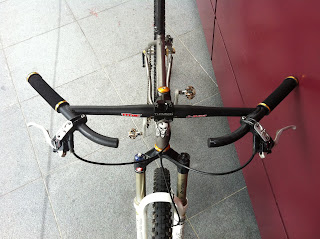
The J-Bar's dimensions are such that your hands sit in a natural position, angled much like they are if you have your arms resting at the side of your body. I presume this will be more comfortable overall, especially on long rides. This wrist position give you plenty of leverage to move the bike laterally. I'm sure on technical spots this will improve my handling.

It has 0 degrees of rise, not quite what I'm used to. Normally this lack of rise would put me a bit further forward on the bike, but with the rearward sweep of the bar, I'm in about the same position I was with my previous riser bar.

But now with my hands closer to my shoulders, I expect to be able to use my back and shoulders to pull up on the bar and push down on my pedals harder, as explained on the Jeff Jones site here (towards the bottom of the page).

I haven't tried the bar on the trail yet, just a short ride around the neighborhood, but the Jeff Jones also explains that in very tight corners, your outside wrist isn't kinked into an unnatural angle, allowing you to keep your control and flexibility.

Installed and ready to rip
The width is an acceptable 660mm, keeping up with today's other fashionably-wide bars. It does not use the 31.8 shim the original Jones bar does - it is already 31.8.

The front appendages will make nice alternative hand rests, and could also serve as a light or GPS holder.


It took a while to find what felt like the best position of the bars (rotation in the stem) I'm still experimenting - I may want to angle the bar a bit more down to the front.

The only thing that I struggled with was mounting my Shimano XT brakes on it. They barely fit around the curves of the front 'horns' of the bar, and it took me a bit of pounding with a rubber mallet to get them on. I couldn't have done it without the hammer. And in doing so, the brakes scraped off the black paint a bit. No big deal but not quite what I'd hope if they were brand new.

I need longer brake cables
You'll also notice in the photo above that my brake cables aren't quite as long as they should be. They still work fine but could use a few more centimeters.

We'll see how the J-Bar fares on the trails, specifically up some good hills and through some technical areas - more soon.

----------  ----------

Update 1

I did 25km of trails this morning. For the first hour, I loved the bar. I was convinced this was the bar for me, and was even considering buying the Jones titanium version.

But after that hour, a pain started developing on the inside of my right wrist - sort of where the thumb meets the arm. Probably due to my hand being bent or even kinked a bit too much.

The night before, I had read a bit in forums about how to best mount this bar, and everybody seemed to agree the bar should be angled back a bit, so the bottoms of the grips point down to the ground a bit. The way I rode them was the opposite - pointing a little up, which now I understand to probably not be quite right.

Nevertheless, the leverage I could pull was awesome. And I found a few comfortable hand positions which were nice for some variety. Overall, I like it, I just need to experiment with it.

But at US $380 I will be sure I like this concept before buying a titanium Jones H-bar.

Update 2

After having adjusted the bar and riding another 27km, my opinion is back to what it was for the first hour of the first ride: It's the bar for me.

Tilting the bar back more so your grip is more like you're holding a gun made all the difference. No wrist pain or discomfort.

I also tilted the brake levers way forward so now they are pointing almost straight down. It's just the natural position your hands need. Everything is smoother and more ergonomic.

We'll see about that titanium Jones bar!

Sunday, August 21, 2011

Basic Chris King Rear Hub Service

Caution: I'm not a mechanic or any kind of bike expert. I hardly know anything at all. But I will try to share what little I do know. What you read here is just based on my own personal experience and the research I've done. It might not be adequate or even accurate.


So don't blame me if you ruin your bike, get hurt, maimed, or die after following my instructions. If you have any corrections or thoughts please let me know - anything to make these instructions clearer or more accurate for others.

It's a good idea to re-lube your Chris King hubs every now and then. Depending on how much you ride, you should do this every other month (if you ride a lot) or every 3-6 months as suggested by Chris King.

A full service is recommended once a year, but if you ride more you may want to do it twice a year. To do this, you'll need the hub servicing tool. We won't cover that here, just the basic service.

Here's a quick guide to servicing your rear hub.

Here's what you'll need:
  • Two 5mm hex wrenches
  • WD-40
  • Chris King Ring Drive Lube
  • Tri-Flow lubricant (I have substituted this with Finish Line chain lube)*
  • General grease (I use Park Tool Polylube 1000)
  • A toothbrush
  • Some rags
Get this from Aspire Velotech
And if your cassette is still on your hub you'll also need:
First, you may want to familiarize yourself with all the parts. Here's a screen capture I took from the Crhis King manual, below.


Here's what you need to do:
  1. Remove your wheel from the bike
  2. Take the skewer out of the hub
  3. Wrap the chainwhip around a gear, insert the lockring remover, put the crescent wrench on the lockring remover and crank it to the left, unscrewing the lockring
  4. Pull the cassette or cog off the hub
  5. Put a 5mm hex key in each side of the axles, where the skewers used to be, and unscrew the hub assembly a bit
  6. Pull the driveshell assembly (including axle) out of the drive side. 
  7. Driveshell assembly with axle still inside
  8. Now you can pull the driveshell out
  9. Then by hand, unscrew the silver cone and axle from the main axle. Unscrew them from each other.
  10. Next pull the axle out of the driveshell. It may not come out very smoothly, just pull, you won't break anything. Here are the two parts you will now have:
  11. A cleaned axle after removal
    Driveshell. Note wear from cassette and singlespeed cog that was added later.
  12. Now that you've taken it all apart, you can get to the RingDrive, the hub shell bearings, and the driveshell bearings.
  13. Spray some WD-40 into the driveshell assembly (image below), and around the outside, to clean it up. You may have to use a clean rag or toothbrush to get all the junk out. There could be sand and all kinds of trail gnar in there.
  14. Cleaned driveshell assembly.
  15. See those cylindrical bearings? Those are the needle bearings. Clean them up and then put a thin layer of RingDrive Lube around them. Put it aside.
  16. Next, using a knife or other sharp instrument, lift up the silver snap ring around the hubshell assembly. Carefully take out the rubber gasket under it. You will now see the bearings. Make sure you put these two parts back together facing the same way you found them (don't flip either over)
  17. The snap ring here is still dirty - it's the part touching the gold hubshell
    Snap ring and gasket removed. You can see a few bearings too
  18. Squirt some WD-40 around the bearings. Be sure not to get any on your rotor if you're lazy enough to have left it on like I was. Also clean the Drive Rings inside the hubshell assembly with a toothbrush. Let it all dry.
  19. Next, run a 3/4 ring of the Ring Drive Lube around the bearings. Spin the bearings to spread the lube around evenly.
  20. You can see the lube running from about 3 to 12 o'clock
  21. While you have the Ring Drive Lube out, spread some over the Ring Drives inside the hub. Put your finger in the non-drive side of the hub, from below, and jiggle the rings so as to open up a gap to insert the lube.
  22. See a bit of lube on the Ring Drives.  Jiggle them with your finger from the non-drive side.
  23. Clean the snap ring and gasket and put them in facing the same way they were originally (don't flip either over). Make sure the bearings can spin freely. If they don't, the snap ring is likely to be improperly seated. Mess with it until everything spins nicely.
  24. Drip some Finish lines around the splines of the driveshell assembly.
  25. Pop it into the hubshell assembly.
  26. Bead some Tri-Flow along the area of the axle where the needle bearings rest - it should be a slightly fatter section. Slide the axle back in.
  27. Put a little bit of general purpose grease on the threads joining the axle ends and adjusting cones. Screw them together until just a bit of threads can still be seen.
  28. Thread this assembly (axle end and adjusting cone) onto the axle fairly tight, but not so tight that the hub can't spin. Tighten the adjusting cone first, then the axle end. For more details on this process see this post, Adjusting Chris King Hubs.
  29. Tighten it all up again with a 5mm hex key in each side.
You can find the official Chris King instructions here, and a super fast video here, but it would be a lot easier if they had photos.

*I'm not a mechanic and I'm not sure if using Finish Line is a good idea, but I have hear of others doing it and I've had no issues doing it, but I can't promise you that you won't.