Saturday, August 27, 2011

Jeff Jones Titec J-Bar

I have always admired Jeff Jones bikes and the unorthodox geometry he designs into them. Plus he's a fellow Oregonian, so that makes me all the more interested in his products.

So when I saw a very lightly-used Titec J-Bar for sale, designed by the man himself, I grabbed it.

Designed by Jones, built by Titec
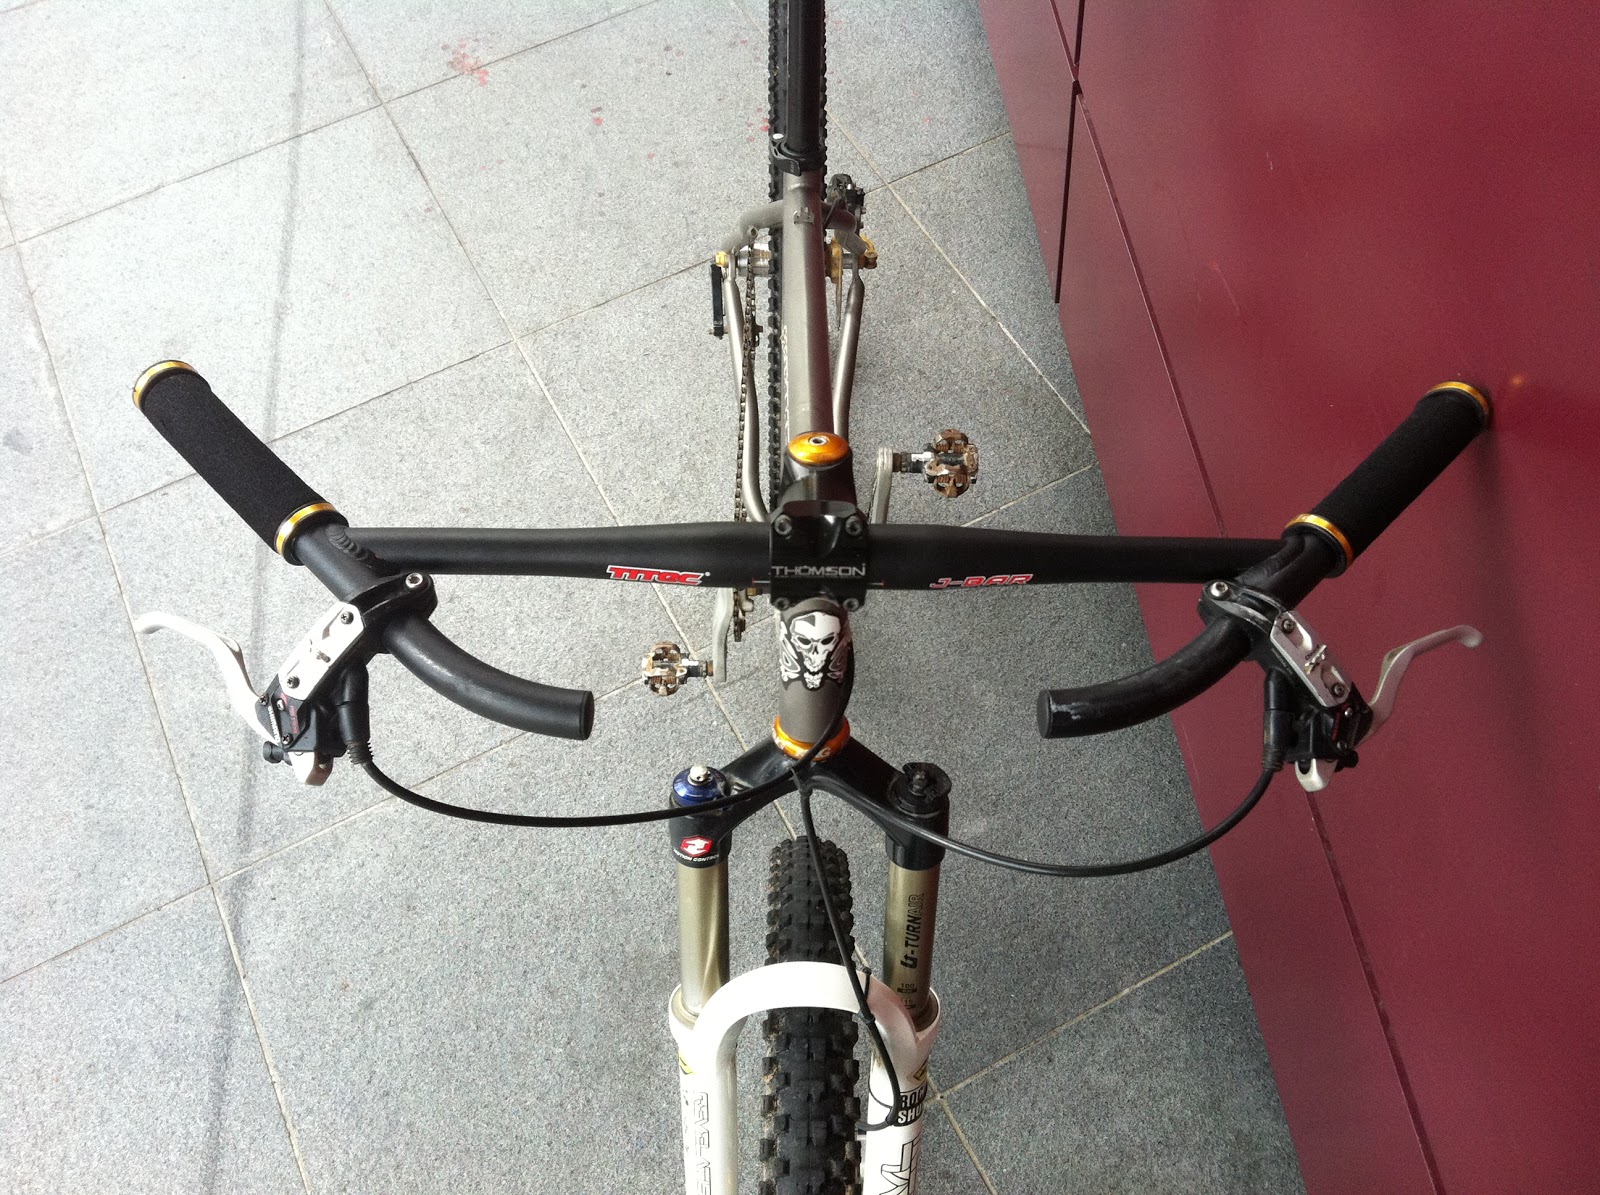
The J-Bar's dimensions are such that your hands sit in a natural position, angled much like they are if you have your arms resting at the side of your body. I presume this will be more comfortable overall, especially on long rides. This wrist position give you plenty of leverage to move the bike laterally. I'm sure on technical spots this will improve my handling.

It has 0 degrees of rise, not quite what I'm used to. Normally this lack of rise would put me a bit further forward on the bike, but with the rearward sweep of the bar, I'm in about the same position I was with my previous riser bar.

But now with my hands closer to my shoulders, I expect to be able to use my back and shoulders to pull up on the bar and push down on my pedals harder, as explained on the Jeff Jones site here (towards the bottom of the page).

I haven't tried the bar on the trail yet, just a short ride around the neighborhood, but the Jeff Jones also explains that in very tight corners, your outside wrist isn't kinked into an unnatural angle, allowing you to keep your control and flexibility.

Installed and ready to rip
The width is an acceptable 660mm, keeping up with today's other fashionably-wide bars. It does not use the 31.8 shim the original Jones bar does - it is already 31.8.

The front appendages will make nice alternative hand rests, and could also serve as a light or GPS holder.


It took a while to find what felt like the best position of the bars (rotation in the stem) I'm still experimenting - I may want to angle the bar a bit more down to the front.

The only thing that I struggled with was mounting my Shimano XT brakes on it. They barely fit around the curves of the front 'horns' of the bar, and it took me a bit of pounding with a rubber mallet to get them on. I couldn't have done it without the hammer. And in doing so, the brakes scraped off the black paint a bit. No big deal but not quite what I'd hope if they were brand new.

I need longer brake cables
You'll also notice in the photo above that my brake cables aren't quite as long as they should be. They still work fine but could use a few more centimeters.

We'll see how the J-Bar fares on the trails, specifically up some good hills and through some technical areas - more soon.

----------  ----------

Update 1

I did 25km of trails this morning. For the first hour, I loved the bar. I was convinced this was the bar for me, and was even considering buying the Jones titanium version.

But after that hour, a pain started developing on the inside of my right wrist - sort of where the thumb meets the arm. Probably due to my hand being bent or even kinked a bit too much.

The night before, I had read a bit in forums about how to best mount this bar, and everybody seemed to agree the bar should be angled back a bit, so the bottoms of the grips point down to the ground a bit. The way I rode them was the opposite - pointing a little up, which now I understand to probably not be quite right.

Nevertheless, the leverage I could pull was awesome. And I found a few comfortable hand positions which were nice for some variety. Overall, I like it, I just need to experiment with it.

But at US $380 I will be sure I like this concept before buying a titanium Jones H-bar.

Update 2

After having adjusted the bar and riding another 27km, my opinion is back to what it was for the first hour of the first ride: It's the bar for me.

Tilting the bar back more so your grip is more like you're holding a gun made all the difference. No wrist pain or discomfort.

I also tilted the brake levers way forward so now they are pointing almost straight down. It's just the natural position your hands need. Everything is smoother and more ergonomic.

We'll see about that titanium Jones bar!

Sunday, August 21, 2011

Basic Chris King Rear Hub Service

Caution: I'm not a mechanic or any kind of bike expert. I hardly know anything at all. But I will try to share what little I do know. What you read here is just based on my own personal experience and the research I've done. It might not be adequate or even accurate.


So don't blame me if you ruin your bike, get hurt, maimed, or die after following my instructions. If you have any corrections or thoughts please let me know - anything to make these instructions clearer or more accurate for others.

It's a good idea to re-lube your Chris King hubs every now and then. Depending on how much you ride, you should do this every other month (if you ride a lot) or every 3-6 months as suggested by Chris King.

A full service is recommended once a year, but if you ride more you may want to do it twice a year. To do this, you'll need the hub servicing tool. We won't cover that here, just the basic service.

Here's a quick guide to servicing your rear hub.

Here's what you'll need:
  • Two 5mm hex wrenches
  • WD-40
  • Chris King Ring Drive Lube
  • Tri-Flow lubricant (I have substituted this with Finish Line chain lube)*
  • General grease (I use Park Tool Polylube 1000)
  • A toothbrush
  • Some rags
Get this from Aspire Velotech
And if your cassette is still on your hub you'll also need:
First, you may want to familiarize yourself with all the parts. Here's a screen capture I took from the Crhis King manual, below.


Here's what you need to do:
  1. Remove your wheel from the bike
  2. Take the skewer out of the hub
  3. Wrap the chainwhip around a gear, insert the lockring remover, put the crescent wrench on the lockring remover and crank it to the left, unscrewing the lockring
  4. Pull the cassette or cog off the hub
  5. Put a 5mm hex key in each side of the axles, where the skewers used to be, and unscrew the hub assembly a bit
  6. Pull the driveshell assembly (including axle) out of the drive side. 
  7. Driveshell assembly with axle still inside
  8. Now you can pull the driveshell out
  9. Then by hand, unscrew the silver cone and axle from the main axle. Unscrew them from each other.
  10. Next pull the axle out of the driveshell. It may not come out very smoothly, just pull, you won't break anything. Here are the two parts you will now have:
  11. A cleaned axle after removal
    Driveshell. Note wear from cassette and singlespeed cog that was added later.
  12. Now that you've taken it all apart, you can get to the RingDrive, the hub shell bearings, and the driveshell bearings.
  13. Spray some WD-40 into the driveshell assembly (image below), and around the outside, to clean it up. You may have to use a clean rag or toothbrush to get all the junk out. There could be sand and all kinds of trail gnar in there.
  14. Cleaned driveshell assembly.
  15. See those cylindrical bearings? Those are the needle bearings. Clean them up and then put a thin layer of RingDrive Lube around them. Put it aside.
  16. Next, using a knife or other sharp instrument, lift up the silver snap ring around the hubshell assembly. Carefully take out the rubber gasket under it. You will now see the bearings. Make sure you put these two parts back together facing the same way you found them (don't flip either over)
  17. The snap ring here is still dirty - it's the part touching the gold hubshell
    Snap ring and gasket removed. You can see a few bearings too
  18. Squirt some WD-40 around the bearings. Be sure not to get any on your rotor if you're lazy enough to have left it on like I was. Also clean the Drive Rings inside the hubshell assembly with a toothbrush. Let it all dry.
  19. Next, run a 3/4 ring of the Ring Drive Lube around the bearings. Spin the bearings to spread the lube around evenly.
  20. You can see the lube running from about 3 to 12 o'clock
  21. While you have the Ring Drive Lube out, spread some over the Ring Drives inside the hub. Put your finger in the non-drive side of the hub, from below, and jiggle the rings so as to open up a gap to insert the lube.
  22. See a bit of lube on the Ring Drives.  Jiggle them with your finger from the non-drive side.
  23. Clean the snap ring and gasket and put them in facing the same way they were originally (don't flip either over). Make sure the bearings can spin freely. If they don't, the snap ring is likely to be improperly seated. Mess with it until everything spins nicely.
  24. Drip some Finish lines around the splines of the driveshell assembly.
  25. Pop it into the hubshell assembly.
  26. Bead some Tri-Flow along the area of the axle where the needle bearings rest - it should be a slightly fatter section. Slide the axle back in.
  27. Put a little bit of general purpose grease on the threads joining the axle ends and adjusting cones. Screw them together until just a bit of threads can still be seen.
  28. Thread this assembly (axle end and adjusting cone) onto the axle fairly tight, but not so tight that the hub can't spin. Tighten the adjusting cone first, then the axle end. For more details on this process see this post, Adjusting Chris King Hubs.
  29. Tighten it all up again with a 5mm hex key in each side.
You can find the official Chris King instructions here, and a super fast video here, but it would be a lot easier if they had photos.

*I'm not a mechanic and I'm not sure if using Finish Line is a good idea, but I have hear of others doing it and I've had no issues doing it, but I can't promise you that you won't.

Friday, August 19, 2011

Cornering Fast on a Mountainbike

Being able to corner well at high-speed is a skill that can really make your riding faster, smoother and of course more fun. If you can't take corners fast enough you will end up losing your momentum, coming to a crawl around bends, and just looking goofy around your faster friends. (Don't worry, we all have faster friends.)

Here are a few tips I recommend trying:

Brake In
A general rule is to enter slow, exit fast. So coming into the corner, apply the brakes evenly and smoothly, but not too much. You'll be leaning the bike so you can take the corner faster than if you were not leaning the bike - more about that below.

Weight the Bike Properly
Keep your weight on your outside pedal, which should be at a down or 6 o'clock position, with your other foot just resting on the other (inside) pedal at the up position for balance. Your outside knee should be close to the frame. Grip the bar so that your arms are more weighted on the inside of the handlebars.

This combination of applying weight to both the inside and outside of the bike gives you leverage and 'huckability'. It allows you to have total control to lean the bike as much or as little as possible. Which leads me to the next tip...

Lean the Bike
I'm sure you rub your knee around the corners on your Ducati or Yamaha but now you're on your Bianchi or Fuji - bicycles are different than motorcycles.

Yes, you still lean the bike, but now that you have your inner handlebar and outside pedal weighted, you are in a good position to keep your body fairly upright. The bike can be down as low as 50 or 60 degrees, but in tight technical corners, your body's momentum can't afford to drop with the bike if you want to pull out of the corner quickly.

So keep your inside arm straight, only bending the elbow slightly, and drop the bike.  You'll be able to quickly pull it up without losing momentum, as you exit the corner.

Point your Body
Your bike will go where you look. Look to the exit of the corner, not to any roots, rocks, puddles or other obstacles in the corner. If you look at them you will likely hit them.

Point your hips and shoulders square with where you intend to go. This rotation will help guide the bike. As you bring your knee towards the frame in the first tip above, you should also twist your hips and body.

In short, face where you want to go.

Weight Your Tires
Just as you have to be careful how you balance left-right, you need to also be aware of your front-back weight distribution. You may have to bring some weight forward to your front tire in order to make it grip the ground better.

Otherwise, it may wash out, making you fall. Doing this right takes a lot of practice, knowledge of the ground conditions and how slippery they are, and an understanding of your tires and their grip characteristics.

Understand the Apex
Just like on the racetrack with your motorcycle or car, you should be able to identify and take the racing line. This is the straightest line between the entrance of the corner and the exit of the corner. The apex is the inside of the curve or corner you are taking.

So what you need to do is:

  1. Approach the corner as wide as possible - so if you are taking a right corner, enter from the left side of the trail.
  2. Turn right and aim for the apex. Taking it this wide will increase your radius.
  3. Cut right across the apex.
  4. Exit wide, as fast as possible, using all the width of the trail. You should end up on the left side of the trail.
  5. Power out as to gain back any speed you may have lost.
Exit Fast
This is point 5 in the previous tip. Once you've successfully negotiated the curve and are back on track, you need to pedal out. If you know the trail or know what to expect, you would have already shifted into the right gear to anticipate the upcoming terrain, so that your pedaling will be efficient.

Conditions
All of these variables depend on your tires, your bike geometry (especially headtube angle), the state of the surface you're on (sandy, wet leaves, water, etc) and especially your knowledge of the trail.

Practice again and again in a corner you're comfortable with and soon you'll find you are taking corners faster, smoother, and like I said before, having more fun.

Tuesday, August 16, 2011

Choosing a Cog


Caution: I'm not a mechanic or any kind of bike expert. I hardly know anything at all. But I will try to share what little I do know. What you read here is just based on my own personal experience and the research I've done. It might not be adequate or even accurate.


So don't blame me if you ruin your bike, get hurt, maimed, or die after following my instructions. If you have any corrections or thoughts please let me know - anything to make these instructions clearer or more accurate for others.


Besides the number of teeth (that's a much bigger discussion here's one of my posts on choosing a ratio) you need to look at the following:


  1. Width of the base
  2. Chain size
  3. Material


There are a few other things to consider, like color, one piece or two, brand, and uh, yeah, price. But those are more subjective and I'll leave them up to you to decide!

I'm assuming you know to buy one that fits your hub, and that your hub isn't a fixie or BMX one that would require a threaded cog. The cogs here are not threaded and will not work on a singlespeed bike.

Width
If you buy a cheap singlespeed conversion kit, it may come with an equally-cheap stamped stainless steel cog. This should be a one-piece skinny one as seen here.
Look how skinny this cheap cog is
So what's wrong with cog with a thin base? It will dig into the freehub body of your hub, especially if your freehub body is of the more common, and softer, aluminum variant (as opposed to stainless steel or titanium).

When a cog (or even cassette) digs into your hub like this it can be difficult to remove, and it destroys part of your hub. You may have to file it down to remove the ridges in the freehub body if this happens.

A higher-quality cog, like a Surly or a Chris King, will be a machined piece with a fatter base. Check it:
See how thick the base is: 4.35mm. By the way, the wear you see is from 428 km of off-road use.
Chain Size
There are two main chain sizes you should know about: 3/32 and 1/8. The first is the standard that you will probably be familiar with if you ride a geared mountain or road bike. The latter is a BMX standard. Either can be used on singlespeeds, but your cogs will have to be compatible.

There are plenty of arguments for both sides, but that is another discussion. If you are converting from geared to singlespeed, it'll be simpler to opt for the more conventional 3/32.

Just ensure that your chainring and your cog match your chain. Notice on the Surly image above it says "3/32"".

Material
Cogs are made from stainless steel, aluminum, titanium, or in the case of the Surly SCM415 ChroMoly. (Turns out motorcycle cogs are made of the same material as Surly's cogs). And in some cases, they're a combination of titanium and stainless steel, as in the case of one example from Homebrewed Components. See image below.

The black center is stainless steel, the teeth titanium
So which material should you choose? Stainless steel is the strongest, but also the heaviest. According to the Homebrewed site, it's two times the weight of titanium, and more than two times the weight of aluminum.

Aluminum is the lightest, but naturally the weakest. It's best for racing and those that don't mind changing their parts more often.

Aluminum can break easily
While not a cog, you can see that aluminum can break easily. This happened under normal conditions, just climbing over a log. It's unlikely that a cog, with a much smaller diameter, would fail so catastrophically, but after having witnessed this absurd breakage, I won't be buying aluminum cogs.

Titanium is by many considered the best of both: It's almost as strong as steel and almost as light as aluminum. But it's expensive.


Wednesday, August 3, 2011

Adjusting Chris King Hubs


Caution: I'm not a mechanic or any kind of bike expert. I hardly know anything at all. But I will try to share what little I do know. What you read here is just based on my own personal experience and the research I've done. It might not be adequate or even accurate.


So don't blame me if you ruin your bike, get hurt, maimed, or die after following my instructions. If you have any corrections or thoughts please let me know - anything to make these instructions clearer or more accurate for others.


Many say that Chris King parts - especially the hubs - are the best you can buy for a bike. All the components within the hubs (bearings, races, etc) are said to be manufactured individually by Chris King in Portland, Oregon. One look at them, or any other King product, and the quality will be evident: beautifully machined stainless steel, titanium, and aluminum in a wide range of colors.

Furthermore, the performance and weight of Chris King hubs are among the best available. Sure, there are lighter hubs, but I doubt there are many lighter hubs with such incredible engagement. Engagement refers to the immediacy with which the hubs grab and rotate the cassette or cog after you move your crank. More engagement means faster and finer ratcheting.

Chris King hubs have 72 points of engagement. Other brands have 72 (such as Hadley) but many have only 48, 36, or 24.

This may sound trivial, but any mountainbike (or trials!) rider that has used them will tell you that in technical sections it sure is nice to have.

Chris King hubs are, however, fairly expensive, but you get what you pay for. You get almost a lifetime of use - that is IF you maintain and service them properly.

If the wheel wobbles left-right as indicated by the arrows,
the hub may need a simple adjustment
The Chris King documentation clearly states when and how to service their hubs, which includes a quick tune-up after a few hours or days of use. (Full Chris King hub and headset manual here - .pdf.) In this period they can become loose, which can be alarming for many first-time owners who spent so much money on them.

These owners don't need to worry as mostly all the servicing that the hubs need can be done at home. All that's needed is a few basic tools, some time, and a desire to learn.

If you lack any one of these things stop reading this now and head to your shop (bring $50-$100 at least)!

Adjustment of Bearing Pre-load - Front or Rear Hubs
Left: Axle end & adjusting cone from front hub
Right: From rear hub
This will be needed any time the wheel seems to move left-right while the skewer is firmly clamped in the drop-outs. This will happen during the initial break-in period. It can happen to the front or rear hub. If you notice this check to make sure your skewers are not simply loose.

If the hubs are brand new you'll just be running through the break-in period which will begin from when the hubs are brand new and may continue up to about 60 hours of riding.

Even on broken-in hubs, you may be able to notice some side-to-side play as you ride. It can be a very unsettling feeling, but don't worry, it can be fixed on the trail, very easily.

Tools needed: Two 5mm hex keys (you may need to borrow a friend's if you only have one)
Estimated time: 90 seconds for expert; 5 minutes for beginner

Step 1: Remove the wheel from the bike.

Step 2: Take the skewer out - be careful not to lose the threaded end cap or the little springs on the skewer.

Step 3: Insert a 5mm hex key in each side of the axle, where the skewer was, and twist each one counter-clockwise. A small aluminum assembly of a cone and a cylindrical knob will screw off (the axle end and adjusting cone).

Two 5mm hex keys counterclockwise


Step 4: Using just your hands, you should be able to separate the axle end and adjusting cone from each other. They are threaded too.


Step 5: Screw the adjusting cone back onto the axle again - without the axle end - and tighten it pretty tight with your fingers. You should be able to spin the wheel between your hand easily by holding onto the cone and the axle on the other side. If it doesn't spin you've threaded it on too tight.

Step 6: Thread the axle end into the adjusting cone by hand. Then really tighten down it using hex keys in both sides (same as in step 3, but tightening).

Step 7: Reinsert the skewers. (By the way, Chris King says not to use titanium skewers - only steel-shafted skewers.)

Step 8: Put the wheel back on the bike, and ensure the skewers are very tight - 1,100 lbs. of clamping force according to Chris King, however much that is! All wobble and play should now be gone, and the wheel should freely and easily spin. If there is still play, the cone is not tight enough. If the wheel doesn't spin easily the cone is too tight.

Step 9: Readjust if necessary.